Category Archives: Home & Garden

Why You Should Raid Your Child’s Piggy Bank Before October

Raiding your child’s piggy bank is not something that I would generally suggest although I am sure there are plenty of people who have suddenly found themselves short of cash or just some change that have needed to do it in the past!

But it might be important that you do it before the middle of October 2017!

The new one pound coin will have 12 sides.

The reason for this is the introduction of the new £1 coin that is happening on 28th March of this year. The new £1 coin will be completely different to the old round one as it will be 12 sided and not round for starters. There are many other aspects of the new pound coin that will be different from the old one in a bid to stop counterfeiters.

You will still be able to use the old £1 coin until 15th October 2017 but after that nobody is obliged to accept the coin. However you will be able to pay it in to most post office and bank accounts, even though you will likely not be able to spend it.

So it is probably a good idea to maybe empty out that piggy bank and either swap it for new coins when you get them, or maybe pay it in to a child’s savings account if they have one.

It will be easier to do this before the 15th October deadline as you (or they) will be able to spend it in shops along with the new one pound coin.

So on 15th October 2017 the old one pound coin will no longer be legal tender.

If you find a stash of £1 coins after the October deadline then take them to your bank.

If you are reading this and it is after the 15th October 2017 deadline and you have found a stash of the old £1 coins then take them into your bank and they should be able to credit them to your account.

No doubt there will be plenty of people finding £1 coins down the back of sofas and in clothes for quite a while to come!


How To Boil Eggs – Simple Instructions on Boiling Eggs

Although to some people boiling an egg might seem like a simple task, it is like everything in life you only learn how to do something by either reading about it, watching someone else or learning from family etc. If you haven’t had anyone in the past who has taught you how to boil an egg and for how long you need to boil an egg for then it’s probably about as simple as changing the oil on a car would be for me!
So below are my instructions for how to make soft boiled eggs and how to make hard boiled eggs.

Basic Procedure For Boiling An Egg

Firstly it is best to use eggs that are not straight out of the fridge and that are at room temperature but if you want to boil an egg now and the eggs are in the fridge then just take it from there!

Fill a small pan with water so that there is enough water in the pan to cover the egg(s) by about half an inch or so. Put the eggs into the pan of cold water. The reason for using cold water rather than putting the eggs straight into boiling water is that this helps to stop them cracking.

Put the pan on the heat and heat it until the water starts boiling. Once the water is boiling then take note of the time – it helps to have a second hand on your watch but it is not essential. The time it takes to boil the eggs depends on if you like soft boiled eggs or hard boiled eggs.

Soft Boiled Eggs – How Long?

Now everyone likes their boiled eggs slightly differently but I like mine with the yolk (yellow) soft and the white cooked all the way through – I can’t stand any uncooked white in my eggs! So, to get soft boiled eggs like that you need to cook them for about 3 minutes 45 seconds as far as I am concerned. 4 minutes is fine if you don’t have a second hand on your watch! Try this out and see if this is how you like you eggs boiled and if you want them a bit more soft boiled or slightly more hard boiled then adjust the time accordingly.

You do need to be reasonably accurate on your timing otherwise, if you do leave them even a little bit longer then you will end up with hard-boiled eggs

Hard Boiled Eggs – How Long?

The same applies to hard boiling eggs in terms of how you like them – how hard you want the centres of the eggs to be. For me, if I want to have hard boiled eggs that I might want to chop up and add mayonnaise to and then put in a sandwich, I will boil the eggs for 5 minutes.

If you want to hard boil eggs for a picnic so that you open them when you are out and you are guaranteed of no runny bits then I would boil eggs for around 7 minutes to make sure they are totally hard boiled. Don’t boil them for too much longer than this otherwise they will likely taste a bit rubbery.

When the eggs are boiled, run them under a cold tap straight away and this should stop that green colour from appearing between the yolk and the white.


How to Remove the Ikea Maximera Drawer

So I recently had an Ikea kitchen fitted as I really liked the configuration in particular of the drawers – they have a range of drawers in different sizes including some really useful 10cm deep drawers.

In fact you can choose whatever configuration of drawers that you want to fit into your units using the Metod bases and Maximera drawer carcasses.

Ikea Drawers
Ikea Drawers

In fact there are so many configurations in the Ikea kitchen that I changed my mind about what size drawers that I wanted in both of my drawer units! However, once I had installed the drawers I had trouble figuring out how to remove the maximera drawer from the rails and tried to Google to find that information but what I found fell short of helping me.

So for that reason I decided to inspect the one maximera drawer that I hadn’t put together to figure out how to get the drawer out. Doing this made me realise how to take the Maximera drawer out and I made a short video for anyone else who is trying to do this and is struggling:

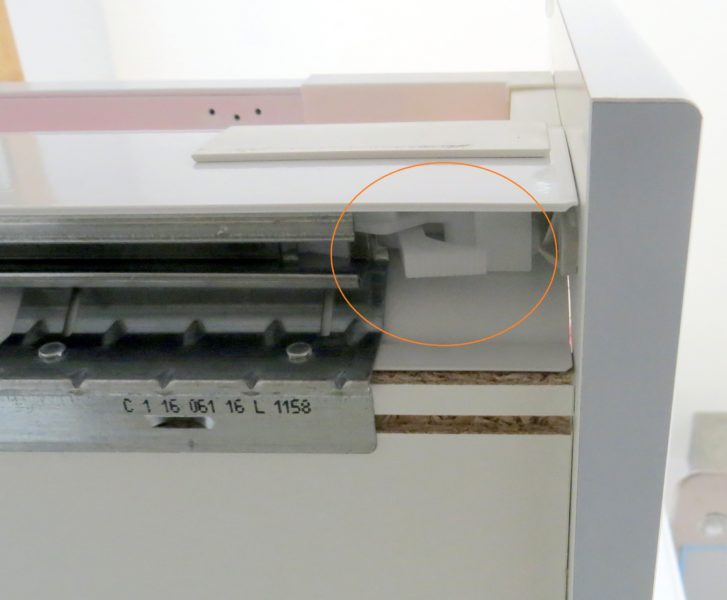
In case you can’t see the video then what you need to do is find the two little clips that are quite near to the drawer front – they look like this:

Maximera Drawer
Maximera Drawer

There is one clip on either side of the maximera drawer and you need to push them both to get the drawer to release from the rails. You can then reposition the drawers where you want.

Where Can you Get RAL Tester Pots?

With many more items being offered in colours in the RAL colour range, it can be useful to know where to get RAL tester pots so that you can check the colour before ordering.

RAL colours come in 210 shades for the matt colours and 183 in a gloss finish. They have been around since 1927.

You can actually buy RAL spray paint colours online for around £10 plus postage and you can get some more common colours in spray paint form from Amazon (see example to the left).

For example, many doors and windows come in anthracite grey which is RAL 7016, so if you need a touch up for that you can certainly get hold of something like that on the left.

In another example, a well known kitchen company offers kitchen that can be painted in any colour in the RAL spectrum. But obviously if you want to check out the colour that you are thinking of buying, then you might want to know where you can get RAL tester pots.

One place that you can go to in the UK is to Homebase where they have a Dulux mixing desk. here they can pretty much mix to any colour that you want including colours in the RAL spectrum.

So it is worth buying a couple of tester pots for £3.29 to decide on what colour you want the whole kitchen to be painted before going ahead with a big purchase like that.

Obviously when you get paint from different sources there may be slight differences in the actual result of the colour achieved so complete matching may be tricky.

In fact if you look online at pictures of specific RAL colours (for example google RAL 1013) you will get a massive variety of shades for one actual colour which will make it difficult to decide what it actually looks like!

How to Cook Parsnips

How To Cook Parsnips

Parsnips are one of those vegetables that, in the UK, only get eaten once a year in some households, and that is at Christmas! However, there is no reason why they can’t be eaten year round and give a bit more variety to your vegetable selection.

As far as I am concerned, the most tasty way that you can cook parsnips is by roasting them. Ideally you can do this as part of a roast dinner so that you can combine their cooking with that of the roast potatoes and other roast vegetables that you might have.

However, you can also just boil or steam parsnips along with other vegetables or mash them on their own or with another vegetable.

Add parsnips to your usual vegetables to get some variety.

Boiling or Steaming Parsnips

Firstly, you will need to clean and peel the parsnips. Put on a large pan of water to boil so that the vegetables will all be covered by the water. Add salt if you wish.

Cut the parsnips into similar shapes as you might with carrots for example into rounds or else you can cut into quarters lengthwise or into strips. The smaller that you cut the parsnips the shorter amount of time they will take to cook. Parsnips take a similar amount of time to cook as carrots.

Now how long you cook your vegetables for does depend to a certain extent to how crispy or not you like your vegetables to be. If you like them to be reasonably hard (al dente) then only simmer them for 8-10 minutes. If you prefer them to be softer then cook for 12-15 minutes. Check with a sharp knife to see if the parsnips are cooked to your liking.

Mashed Parsnips

Another option is to have mashed parsnips. You can have them on their own or also mash them up with swede or something similar.

Once you have chopped the parsnips up into similar sized chunks, bring the water to the boil and simmer the parsnips for around 15-20 minutes. once they are well cooked, drain them and mash the parsnips with a potato masher whilst adding some butter (and possibly a little cream if you are feeling indulgent). You could also add a small amount of a spice like nutmeg to give it a twist.

Roast Parsnips

Roast parsnips may take longer than you think to cook, so make sure you plan in advance. Firstly peel the parsnips, then chop them in half and then cut them into quarters lengthways. If they are quite small they may just need chopping in half.

Parboil your parsnips for a short period of time. Basically this means simmering them in boiling water for only around 3-5 minutes. Drain the parsnips and dry them on some kitchen towel. put the parsnips onto a plate or into a bowl and add salt. Toss the parsnips around in the salt so that they have a light coating. If you want an extra flavour you can also add honey to the parsnips.

Heat up some vegetable oil in a roasting tin or pyrex dish. The oil should just cover the bottom of the tin although the more oil you add the more of a ‘deep-fried’ effect you will give the parsnips. The oven should be at around 220 degrees C but if you are cooking other things in the oven at the same time then you can use a lower heat but just extend the cooking time.

Once the oil has heated up, add the parsnips to the pan and turn them over so that they are completely coated in the oil then put the dish back in the oven. Cook the parsnips for around 30 minutes ensuring that you turn them over during cooking so all sides are evenly browned.